
You will eventually encounter situations involving a very large number of packets. As the number of these packets grows into the thousands and even millions, you will need to be able to navigate through packets more efficiently. For this purpose, Unicorn allows you to find and mark packets that match certain criteria.
Finding Packets
Ax3soft Unicorn support three methods to find packets:
Methods 1: Click thesmall triangle icon right side of filter button on packet tab toolbar to display protocol filter popup-menu, see figure below, if you only view HTTP packets, you click the HTTP menu item. This method is the most convenient.
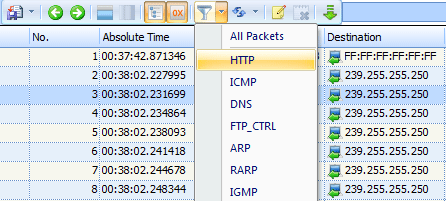
Figure 4-4: filter packets in protocol filter
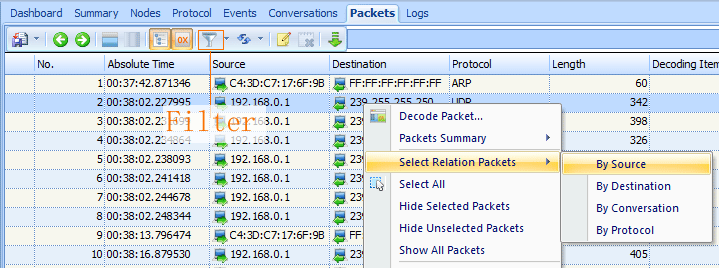
Methods 2: Click the right button of mouse to display a pop-up menu in packets list and click Select Relation Packets item, then you will see a child popup-menu, see figure below. You can click By Source to view all packets which are same address with the packets selected.
Methods 3: If the above two methods can not meet your requirements, you may try the method. It is to build display filter to view packets. A display filter is one that, when applied to a capture file, tells Unicorn to display only packets that match that filter. Display filters are used more often than capture filters because they allow you to filter packet data without actually omitting the rest of the data in the capture file. That way, if you need to revert back to the original capture, you can simply clear the filter expression.
You might use a display filter to clear irrelevant broadcast traffic from a capture file; for instance, to clear ARP broadcasts from the Packet List pane when these packets don’t relate to the current problem being analyzed. However,
because those ARP broadcast packets may be useful later, it’s better to filter them temporarily than it is to delete them.
To filter out all ARP packets in the capture window, simply check Rejection of ARP filter in filter listto remove all ARP packets from the Packet List pane, as shown in Figure 4-6. To display filter settings window, please click filter button on toolbar, see figure above. About how to create a filter, please access the http://unicorn.ids-sax2.com/en/.
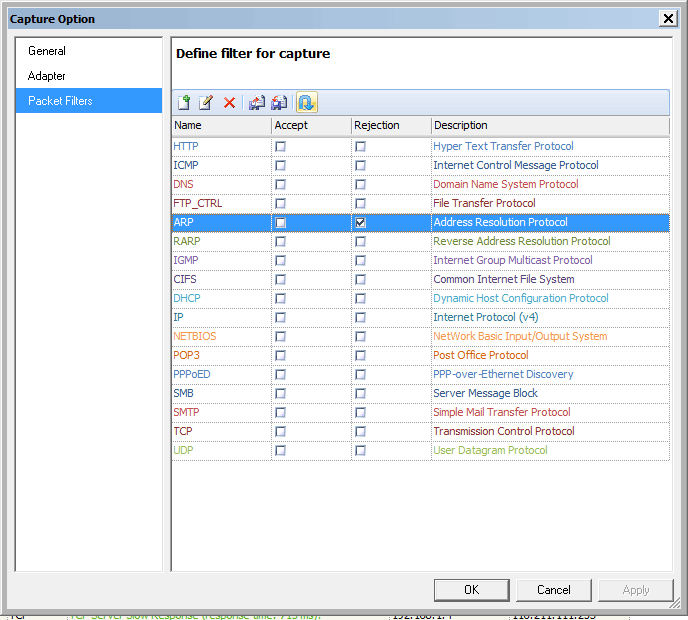
Figure 4-6: filter list
Highlight Packets
After you have found the packets that match your criteria, you can highlight those of particular interest. For example, you may want to highlight packets to be able to save those packets separately or to find them quickly based on the coloration. highlighted packets stand out with a yellow background, as shown in Figure 4-7.
To highlight a packet, right-click it in the Packet List pane and choose highlight from the pop-up or click a packet in the Packet List pane. To un-highlight a packet, toggle this setting off Clicking highlight again.
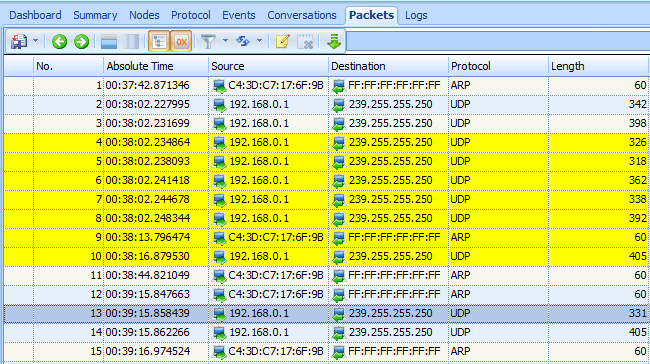
Figure 4-7: A marked packet is highlighted on your screen. In this example, packet 4-10 is marked and appears darker.